MCP Server (BETA)
MCP Server is in beta. Its behavior, available tools, and client configuration may change. If you find an issue or have a suggestion, submit a support ticket and identify the feature as MCP Server (BETA). Never include an MCP key in a support ticket.
Appsmith's Model Context Protocol (MCP) server lets compatible AI clients connect to Appsmith through a structured API. An MCP client can use the Appsmith capabilities available to the user who created its key, including working with apps and their resources.
An MCP key authenticates the client as you. It does not grant the client additional Appsmith permissions. Any request made with your key is limited to the same organizations, workspaces, apps, and actions that your Appsmith account can access.
This guide covers MCP setup for Appsmith Business Cloud and self-hosted Enterprise deployments.
Before you begin
- An Appsmith administrator must enable MCP Server for the organization or instance.
- Each user must create their own MCP key. Do not share a key between users.
- Your AI client must support a remote MCP server and must be able to send the key as an
Authorizationheader. Appsmith MCP Server authenticates with the key only; it does not offer an OAuth sign-in flow. Clients whose connectors support only OAuth or no authentication, such as ChatGPT conversations, cannot connect. See Client compatibility.
Enable MCP Server
MCP Server is off by default. The location of the setting depends on your Appsmith deployment.
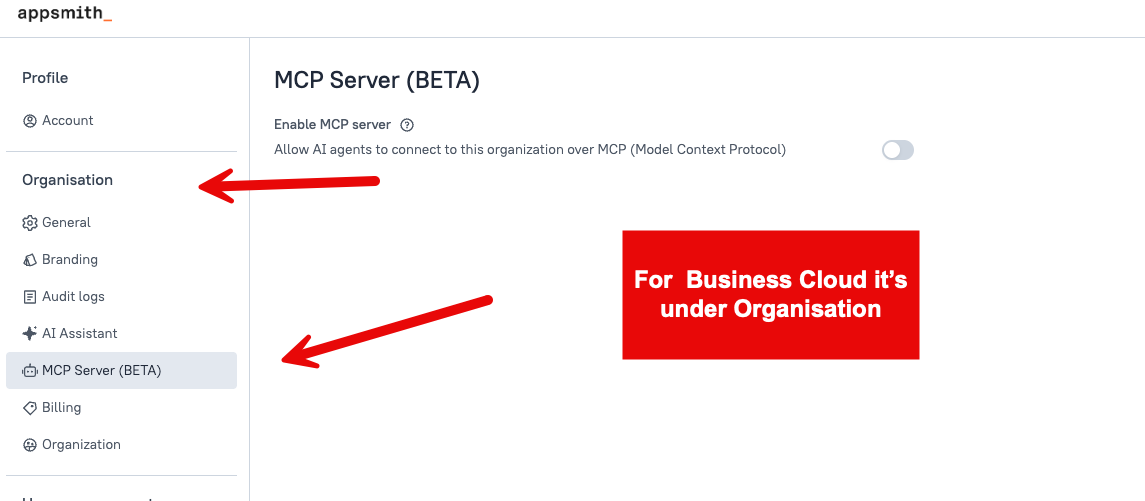
Business Cloud
To enable MCP Server for a Business Cloud organization:
- Open Admin Settings.
- Under Organisation, select MCP Server (BETA).
- Turn on Enable MCP server, and save the setting.
Self-hosted Enterprise
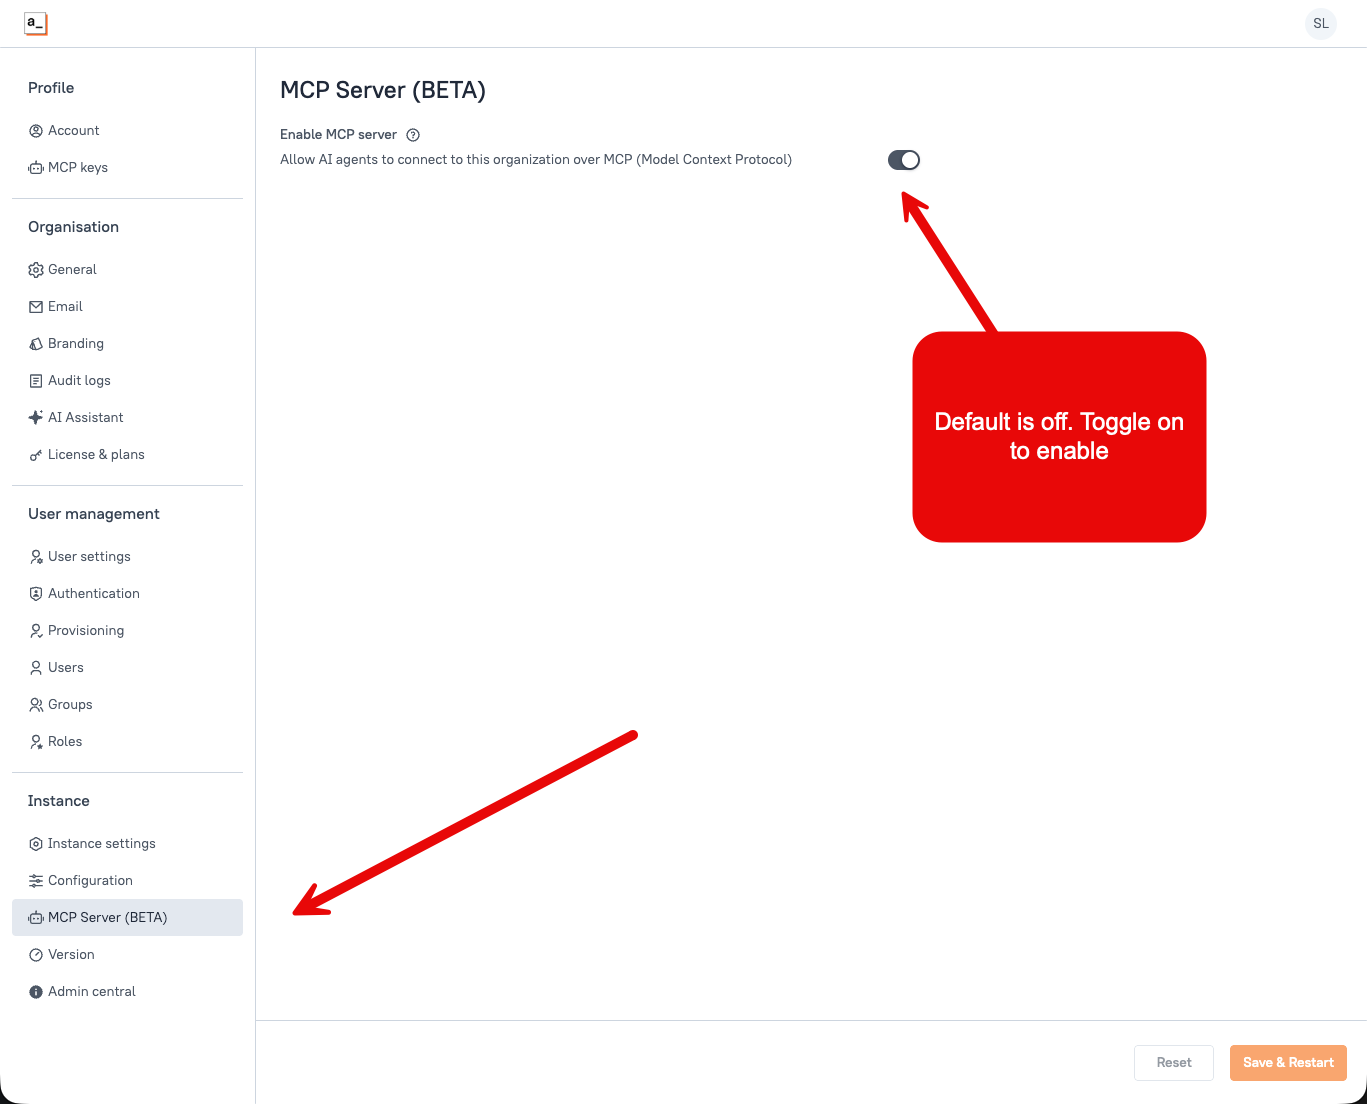
To enable MCP Server for a self-hosted Enterprise instance:
- Open Admin Settings.
- Under Instance, select MCP Server (BETA).
- Turn on Enable MCP server.
- Click Save & Restart to apply the setting.
When MCP Server is disabled, Appsmith removes access to the /mcp endpoint, prevents users from creating or rotating keys, and rejects requests made with existing keys. Disabling the server does not revoke the keys. Revoke a key separately if you want to invalidate it permanently.
Run MCP Server on more than one replica
On a self-hosted instance that runs two or more Appsmith replicas behind a load balancer, MCP Server shares its sessions through the Redis instance that APPSMITH_REDIS_URL points to, the same Redis that Appsmith already uses for user sessions. Any replica can serve any MCP session, and an approval prompt answered on one replica reaches the replica that asked for it. No additional configuration is required.
MCP clients do not send cookies, so sticky sessions on the load balancer cannot keep an MCP session on one replica. Without the shared session store, a request that reaches a replica other than the one that opened the session fails with HTTP 404, and clients see intermittent errors and missing tool lists.
Keep the following in mind when you run multiple replicas:
APPSMITH_REDIS_URLmust point to one Redis instance that every replica can reach. See Configure External Redis.- If the Redis user has a restricted ACL, grant read and write access to keys that start with
appsmith:mcp:, permission to runEVAL(the@scriptingcategory; MCP Server uses two short Lua scripts for entity locks and one-time confirmations), andPUBLISHandSUBSCRIBEaccess to channels that start withappsmith:mcp:relay:. MCP Server refuses to start if it cannot subscribe, and the container log for themcpprogram explains why. - Each replica opens two additional Redis connections for MCP Server. Redis is not a credential store: MCP Server never writes a user's MCP key to it, and a session record holds only a hash that binds the session to the key that opened it. Every Redis entry that MCP Server writes, all under the
appsmith:mcp:prefix, carries a time to live, so flushing them only drops open MCP sessions, and compliant clients reconnect automatically. - During a rolling upgrade to a version that includes the shared store, sessions opened on a replica running the older version fail with HTTP 404 on replicas running the newer version, and the reverse, until the rollout completes. MCP clients reconnect on their own.
Create an MCP key
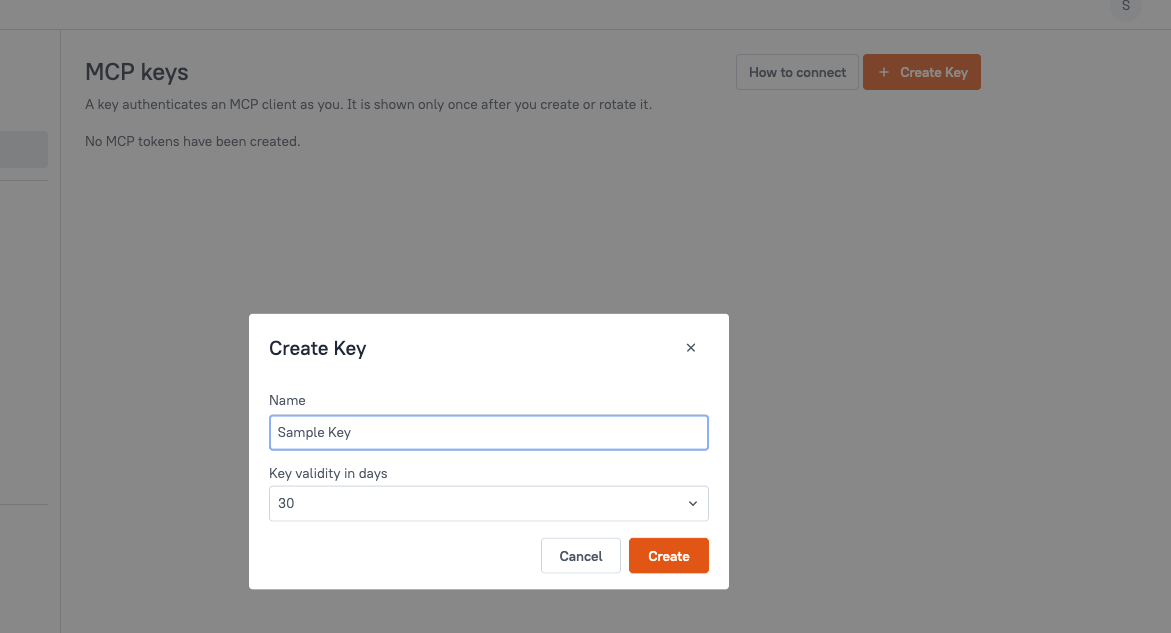
After an administrator enables MCP Server, each user can create and manage keys from their own profile:

- Open Admin Settings.
- Under Profile, select MCP keys.
- Click Create Key.
- Enter a descriptive name, up to 50 characters, that identifies the client or purpose of the key.
- Select how long the key should remain valid: 30, 60, 90, 180, or 365 days. The default is 30 days.
- Click Create.
You can have up to 10 MCP keys that have not been revoked. Expired keys count toward this limit, so revoke an unused or expired key before creating another one.
Copy the key and connect your client
Appsmith shows the key only once, immediately after you create or rotate it. Before closing the confirmation window, copy either the key, labelled MCP token in this window, or the complete client configuration, and store it securely.
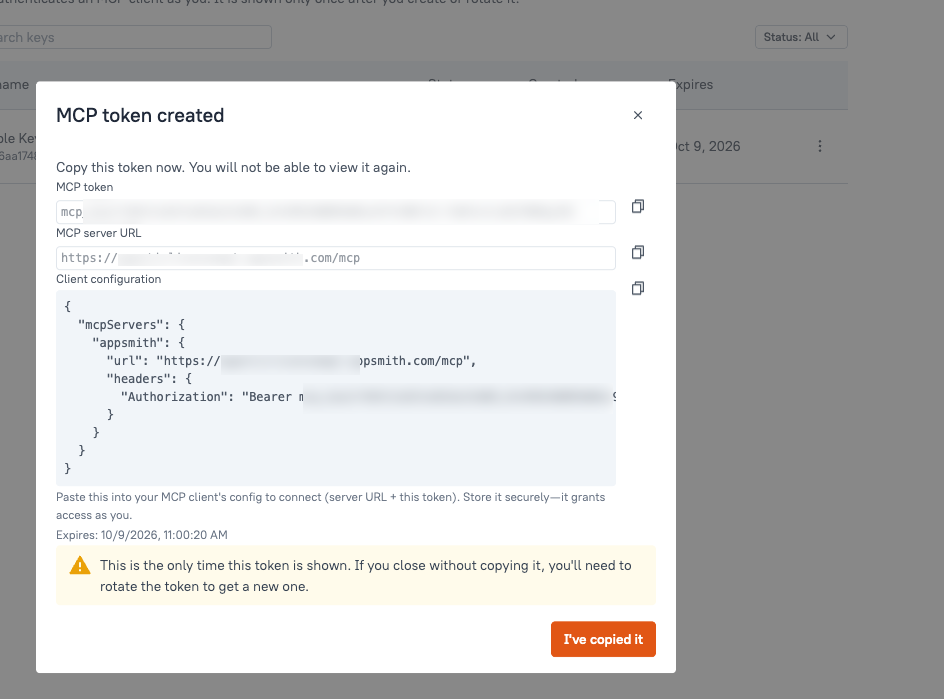
Choose your AI client and add the configuration using the MCP server URL and key from that window. Replace YOUR_APPSMITH_DOMAIN and YOUR_MCP_KEY with those values.
You can return to Profile > MCP keys and click How to connect to copy the server URL and a configuration template, but Appsmith cannot display an existing key again.
- Cursor
- VS Code
- Claude Code
- Claude.ai
- Claude Desktop
- Codex
- ChatGPT desktop app
- Windsurf
- Other
-
Open Cursor Settings → Tools & MCP, or edit the config file:
- macOS / Linux:
~/.cursor/mcp.json - Windows:
%USERPROFILE%\.cursor\mcp.json - Project-level:
.cursor/mcp.jsonin the project root
- macOS / Linux:
-
Add the Appsmith server:
{
  "mcpServers": {
    "appsmith": {
      "url": "https://YOUR_APPSMITH_DOMAIN/mcp",
      "headers": {
        "Authorization": "Bearer YOUR_MCP_KEY"
      }
    }
  }
} -
Save the file and restart Cursor if the server does not appear.
This is the same JSON structure Appsmith generates when you create a key.
-
Create
.vscode/mcp.jsonin your project, or open the Command Palette and run MCP: Open User Configuration. -
Add the Appsmith server:
{
  "servers": {
    "appsmith": {
      "type": "http",
      "url": "https://YOUR_APPSMITH_DOMAIN/mcp",
      "headers": {
        "Authorization": "Bearer YOUR_MCP_KEY"
      }
    }
  }
} -
Save the file. VS Code detects the configuration without a restart.
VS Code uses a servers object and requires "type": "http". Do not paste the Appsmith-generated mcpServers block into this file unchanged.
-
In a terminal, run:
claude mcp add --transport http appsmith https://YOUR_APPSMITH_DOMAIN/mcp \
--header "Authorization: Bearer YOUR_MCP_KEY" -
In Claude Code, run
/mcpand confirm that the Appsmith server is connected.
The server is registered immediately. You do not need to restart Claude Code.
Claude.ai connects through a custom connector. The connector must send the key in a request header, which is available only when your Claude account has the request-headers option in the connector settings. If the option is missing, use Claude Code or the Claude Desktop mcp-remote configuration instead.
A custom connector sends the same request header for everyone who can use it. Do not add an Appsmith connector under Organization settings → Connectors on a Team or Enterprise plan: an organization connector would send your MCP key, and therefore your Appsmith identity and permissions, for every member of the organization. Each member adds their own connector with their own key. The key is stored by the connector service rather than on your computer, so choose a short validity period and revoke the key when you remove the connector.
- Open Settings → Connectors for your own account.
- Click Add custom connector.
- Enter a name and the URL
https://YOUR_APPSMITH_DOMAIN/mcp. - Under Authentication, select No sign-in.
- Under Request headers, add a header named
authorizationwith the valueBearer YOUR_MCP_KEY, including the wordBearerand the space, and mark it as required. - Click Add, then enable the connector in the chat where you want to use it.
Do not select a sign-in option. Appsmith MCP Server does not offer an OAuth flow, so a connector configured to sign in looks for OAuth endpoints that do not exist and reports that it cannot reach the server. You cannot change the authentication settings of an existing connector; remove it and add it again.
The same connector is available in Claude Desktop once it is added to your Claude account.
Claude Desktop does not send custom HTTP headers to remote MCP servers from its local configuration file. Either add a custom connector as described in the Claude.ai tab, or use the mcp-remote wrapper, which requires Node.js 18 or later.
-
Open the Claude Desktop config file:
- macOS:
~/Library/Application Support/Claude/claude_desktop_config.json - Windows:
%APPDATA%\Claude\claude_desktop_config.json
- macOS:
-
Add the Appsmith server:
{
  "mcpServers": {
    "appsmith": {
      "command": "npx",
      "args": [
        "-y",
        "mcp-remote",
        "https://YOUR_APPSMITH_DOMAIN/mcp",
        "--header",
        "Authorization:Bearer YOUR_MCP_KEY"
      ]
    }
  }
}
On Windows, if
npxis not found, set"command"to"cmd"and add"/c"and"npx"as the first two arguments. -
Fully quit and relaunch Claude Desktop. Closing the window is not enough.
Do not put a space after the colon in "Authorization:Bearer YOUR_MCP_KEY".
Codex sends the Bearer token from an environment variable. Do not put the MCP key in config.toml.
-
Store the key in your environment, for example:
export APPSMITH_MCP_KEY="YOUR_MCP_KEY" -
Add the server:
codex mcp add appsmith --url https://YOUR_APPSMITH_DOMAIN/mcp --bearer-token-env-var APPSMITH_MCP_KEYOr add the equivalent entry to
~/.codex/config.toml:[mcp_servers.appsmith]
url = "https://YOUR_APPSMITH_DOMAIN/mcp"
bearer_token_env_var = "APPSMITH_MCP_KEY" -
Confirm that
APPSMITH_MCP_KEYis set in the environment that launches Codex.
By default, Codex runs Appsmith read operations and non-destructive edits without asking for approval and asks for approval before creating a branch or confirming a destructive operation. Your own Codex approval settings can make it ask more often. See How clients ask for approval.
The ChatGPT desktop app includes Codex. MCP servers that you add in the app are available in Codex threads only. A regular ChatGPT conversation does not load them and reports that the server is not available in the chat.
- In the ChatGPT desktop app, open Plugins → MCPs.
- Add a server with the URL
https://YOUR_APPSMITH_DOMAIN/mcp. - Add a header named
Authorizationwith the valueBearer YOUR_MCP_KEY. - Save the server. The app writes the entry to
~/.codex/config.toml, the same file that the Codex CLI uses, with the header value, including your key, stored in plain text. Keep that file private and out of any dotfiles repository. To keep the key out of the file, edit the generated entry so that it usesbearer_token_env_varas shown in the Codex tab; the same entry then serves the Codex CLI and Codex threads in the app, provided the variable is set in the environment that launches the ChatGPT app, not only in your shell. - Start a new Codex thread on a local environment and ask it to work with Appsmith. Threads that were open before you added the server do not see it.
ChatGPT connectors for regular conversations require either OAuth sign-in or no authentication, and neither works with an Appsmith MCP key. If you need Appsmith in a ChatGPT conversation rather than a Codex thread, submit a support ticket describing your use case.
-
Edit the Windsurf MCP config file:
- macOS / Linux:
~/.codeium/windsurf/mcp_config.json - Windows:
%USERPROFILE%\.codeium\windsurf\mcp_config.json
- macOS / Linux:
-
Add the Appsmith server:
{
  "mcpServers": {
    "appsmith": {
      "serverUrl": "https://YOUR_APPSMITH_DOMAIN/mcp",
      "headers": {
        "Authorization": "Bearer YOUR_MCP_KEY"
      }
    }
  }
} -
Save the file and refresh MCP servers in Cascade.
Windsurf uses serverUrl for remote servers, not url. If you paste the Appsmith-generated configuration, rename url to serverUrl.
For any client that supports a remote MCP server and custom headers, use:
- URL:
https://YOUR_APPSMITH_DOMAIN/mcp - Transport: Streamable HTTP
- Header:
Authorization: Bearer YOUR_MCP_KEY
A typical configuration looks like this:
{
  "mcpServers": {
    "appsmith": {
      "url": "https://YOUR_APPSMITH_DOMAIN/mcp",
      "headers": {
        "Authorization": "Bearer YOUR_MCP_KEY"
      }
    }
  }
}
If the client only supports locally launched MCP servers, wrap the remote endpoint with mcp-remote:
{
  "mcpServers": {
    "appsmith": {
      "command": "npx",
      "args": [
        "-y",
        "mcp-remote",
        "https://YOUR_APPSMITH_DOMAIN/mcp",
        "--header",
        "Authorization:Bearer YOUR_MCP_KEY"
      ]
    }
  }
}
Consult the client's documentation for the exact file location and field names.
An MCP key grants the client access as your Appsmith user. Do not commit it to source control, include it in logs, paste it into a support ticket, or share it with another person. Use a separate key for each client, choose the shortest practical validity period, and revoke a key immediately if it might have been exposed.
Client compatibility
Appsmith MCP Server authenticates every request with the MCP key sent as a bearer token. It does not provide an OAuth authorization server, so a client can connect only if it can send the key in an Authorization header or through a wrapper such as mcp-remote.
| Client | Supported | How it sends the key |
|---|---|---|
| Cursor, VS Code, Windsurf, Claude Code, Codex CLI | Yes | Authorization header in the client configuration |
| Claude.ai and Claude Desktop custom connectors | Yes, when the connector settings offer request headers | Request header on a connector added under your own account, never an organization connector |
| Claude Desktop local configuration | Yes | mcp-remote wrapper |
| ChatGPT desktop app, Codex threads | Yes | Header on the server entry under Plugins → MCPs |
| ChatGPT conversations and ChatGPT connectors | No | ChatGPT connectors support only OAuth sign-in or no authentication |
How clients ask for approval
Every Appsmith MCP tool describes itself to the client with standard MCP tool annotations: whether it only reads, whether it can destroy data, and whether it reaches outside the Appsmith instance. Clients that decide on their own when to ask you for approval, such as Codex and the ChatGPT desktop app, use these annotations as follows by default; your own approval settings in the client can make it ask more often.
- Read operations, such as listing workspaces or reading a page, run without a prompt. This includes running an action that Appsmith has verified as read-only against your datasource.
- Non-destructive edits, such as building an app or adding a query, run without a prompt. These changes are revision-checked and recorded, and they apply to the unpublished version of an existing app.
build_applicationalso deploys the first version of the new app it creates so that its viewer URL works; every later deploy goes through theprepare_publishandconfirm_publishflow. - Destructive operations always use a two-step flow: a
prepare_*tool that describes what is about to happen, followed by aconfirm_*tool. The confirm step is the one the client asks you to approve. Deleting a page, query, API, or JS object; deploying an app; rolling back a change; committing to Git; and running an action that can modify data all follow this flow. - Creating a Git branch and committing to Git push to your Git remote, so clients treat them as operations that reach outside Appsmith and ask for approval.
When the client supports MCP elicitation, Appsmith also shows its own approval prompt for the confirm step, with the exact scope of the change. Claude clients keep their own approval flow and do not change their behavior based on the annotations. The annotations describe the server's rules; they do not replace them.
Manage MCP keys
On the MCP keys page, you can review a key's name, status, creation date, and expiration date. You can also search for keys and filter them by status.
- Rotate a key to replace its current secret. The old secret stops working immediately, and Appsmith displays the replacement only once. Update the client configuration with the new key.
- Revoke a key to permanently prevent clients from using it.
- Expired keys no longer authenticate. Create a new key or rotate the expired key, and update your client configuration.
Creating, rotating, and revoking MCP keys requires your normal signed-in Appsmith session. An MCP key itself cannot be used to manage keys.
If an administrator disables a user's Appsmith account, requests made with that user's MCP keys are rejected. Administrators should therefore apply the same least-privilege access practices to MCP users that they use elsewhere in Appsmith.
Troubleshoot a connection
| Problem | What to check |
|---|---|
| MCP keys is not visible under Profile | Ask an administrator to confirm that MCP Server is enabled, then refresh Appsmith. |
| The client cannot find the server | Confirm that the URL uses your Appsmith domain and ends in /mcp. On self-hosted Enterprise, confirm that the administrator clicked Save & Restart after enabling the server. |
| The client receives an authentication error | Confirm that the header is Authorization: Bearer YOUR_MCP_KEY and that the key has not expired, been rotated, or been revoked. Also confirm that MCP Server and your Appsmith user account are enabled. For a Codex CLI entry, confirm that the environment variable named in bearer_token_env_var is set; for a server added from the ChatGPT desktop app, confirm the header value on the entry under Plugins → MCPs. |
| The client connects but cannot perform an action | The client has the permissions of the key owner. Confirm that your Appsmith user has access to the relevant organization, workspace, app, and action. |
| The configuration is rejected by the client | Use the tab for your client in Copy the key and connect your client. Common mismatches: VS Code expects servers and "type": "http"; Windsurf expects serverUrl; Claude Desktop needs mcp-remote. |
| Claude.ai reports that it cannot reach the server | The connector was added with a sign-in option. Remove the connector and add it again with No sign-in and the authorization request header, as described in the Claude.ai tab. |
| ChatGPT reports that the Appsmith server is not exposed to the chat or that no tool was found | You asked in a regular ChatGPT conversation. MCP servers added under Plugins → MCPs are available only in Codex threads. Start a new Codex thread on a local environment and ask there. |
| Codex or the ChatGPT desktop app asks for approval on every call, or reports that the server has no usable tools | The instance is running an Appsmith version from before tool annotations were added, so the client treats every tool as destructive. Upgrade Appsmith. |
| On a multi-replica instance, requests fail with HTTP 404 on roughly every other call | The replicas are not sharing MCP sessions. Confirm that every replica runs a version that includes the shared session store and that APPSMITH_REDIS_URL points to one Redis instance that every replica uses. See Run MCP Server on more than one replica. |
| Every authenticated request returns HTTP 503 with an MCP session relay error | A replica could not subscribe to its Redis channel at startup. Check Redis connectivity from that replica and confirm that the Redis user is allowed to SUBSCRIBE. |
Because MCP Server is in beta, please open a ticket in the Appsmith Support Portal for connection problems, unexpected behavior, or feature suggestions. Include your Appsmith version, deployment type, AI client name and version, and steps to reproduce the issue. Redact keys and other secrets from screenshots, logs, and configuration files. For more information, see Support at Appsmith.